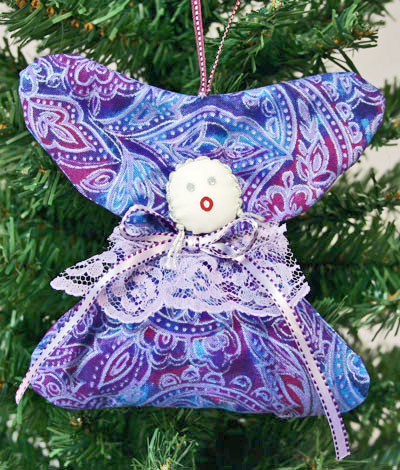
Easy Angel Crafts: Quilter's Angel
This Easy Angel Crafts Quilter's Angel was inspired by a friend's angels she made with scraps in a quilting class.
This Easy Angel Crafts Quilter's Angel uses similar concepts but with a pattern unique to funEZcrafts.
The steps are easy and can be made using hand stitches as shown here, or just as prettily, several of the steps can be sewn by machine.
This Easy Angel Crafts Quilter's Angel uses similar concepts but with a pattern unique to funEZcrafts.
The steps are easy and can be made using hand stitches as shown here, or just as prettily, several of the steps can be sewn by machine.
Let's look at the materials and the steps for how to make the quilter's angel:
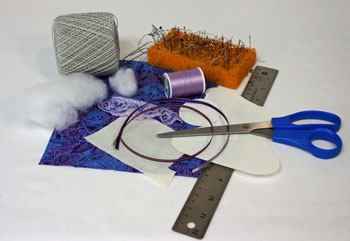
Easy Angel Crafts: Quilter's Angel Materials and Tools:
Patterned fabric scrap 6 inches by 12 inches
Solid fabric scrap for face 3 inches by 3 inches
Thread to match patterned fabric
Sewing needle
Straight pins
Silver yarn for hair
Yarn darner needle
Scrap of lace 1 1/2 to 2 inches wide by 4 inches
Fiberfill or cotton balls
Narrow ribbon for neck 1/4 to 3/8 inch wide by 12 inches long
Narrow ribbon for hanging loop 1/4 to 3/8 inch wide by 12 inches long
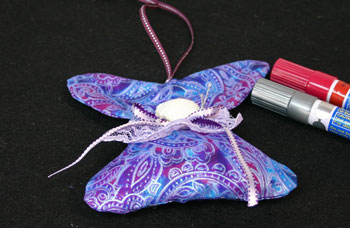
Paint pens for face (not shown in picture below) (Alternatively, you can use cosmetic pens, ink pens or pencils to draw the face.)
Ruler
Scissors
Iron (not shown)
Angel and circle shapes from Angel pattern (click here for the Easy Angel Crafts Quilter's Angel pattern)
Solid fabric scrap for face 3 inches by 3 inches
Thread to match patterned fabric
Sewing needle
Straight pins
Silver yarn for hair
Yarn darner needle
Scrap of lace 1 1/2 to 2 inches wide by 4 inches
Fiberfill or cotton balls
Narrow ribbon for neck 1/4 to 3/8 inch wide by 12 inches long
Narrow ribbon for hanging loop 1/4 to 3/8 inch wide by 12 inches long
Paint pens for face (not shown in picture below) (Alternatively, you can use cosmetic pens, ink pens or pencils to draw the face.)
Ruler
Scissors
Iron (not shown)
Angel and circle shapes from Angel pattern (click here for the Easy Angel Crafts Quilter's Angel pattern)
The Steps for How to Make the Easy Angel Crafts: Quilter's Angel:
Print the Easy Angel Crafts Quilter's Angel pattern page. (The page also includes patterns for the Easy Angel Crafts Angel Gift Bag and the Easy Angel Crafts Angel Trio.)
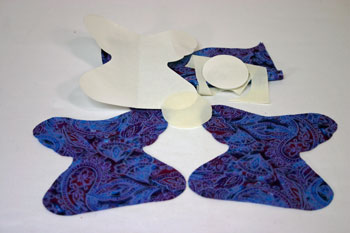
Cut out the angel and circle shapes specified for the Quilter's Angel from the pattern page.
Pin the pattern pieces to the fabric.
Cut two of the angel shapes from the patterned fabric and one of the circle from the solid fabric.
Cut out the angel and circle shapes specified for the Quilter's Angel from the pattern page.
Pin the pattern pieces to the fabric.
Cut two of the angel shapes from the patterned fabric and one of the circle from the solid fabric.
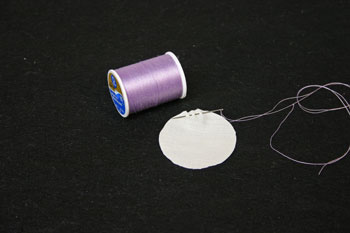
Thread the sewing needle with thread.
Sew around the circle using small stitches.
Leave three inches of thread at the start of the stitches.
This will be used to gather the circle.
Sew around the circle using small stitches.
Leave three inches of thread at the start of the stitches.
This will be used to gather the circle.
Gently pull both ends of the thread to begin gathering the shape. (This technique is sometimes called a yo-yo.)
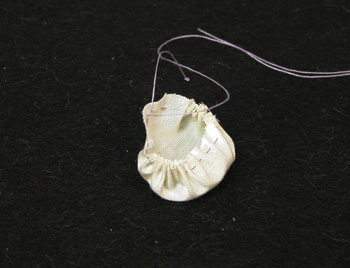
Add a small amount of fiberfill or cotton to the inside of the shape.
Pull the ends of the thread to tighten the shape around the fiberfill.
Tie the ends of the thread into a knot to hold the gathered shape.
Pull the ends of the thread to tighten the shape around the fiberfill.
Tie the ends of the thread into a knot to hold the gathered shape.
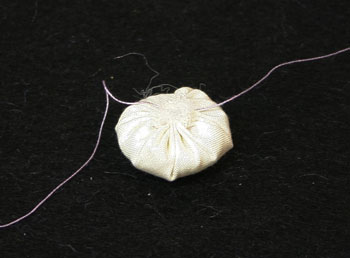
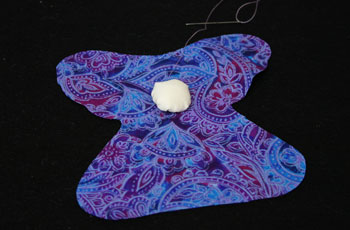
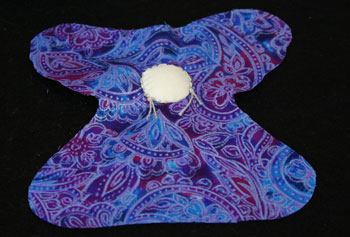
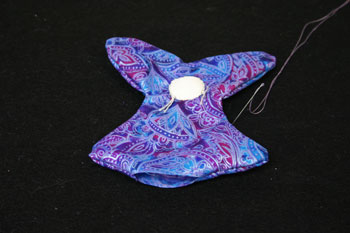
On the right side of one of the Easy Angel Crafts Quilter's Angel shapes, position the gathered "yo-yo" just above the center of the narrow portion of the pattern.
With the needle and thread, sew the gathered shape to the angel.
Use small stitches all the way around the yo-yo.
With the needle and thread, sew the gathered shape to the angel.
Use small stitches all the way around the yo-yo.
Thread the yarn darner needle with a double strand of the silver yarn.
Tie a knot in the end leaving 3/4 inch of yarn below the knot for hair.
Tie a knot in the end leaving 3/4 inch of yarn below the knot for hair.
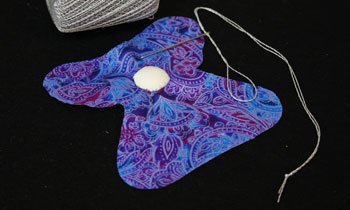
Begin stitching the yarn to the yo-yo just below where an ear would be.
Stitch around the yo-yo shape with the silver yarn.
Make the stitches visible to simulate hair.
Stitch around the yo-yo shape with the silver yarn.
Make the stitches visible to simulate hair.
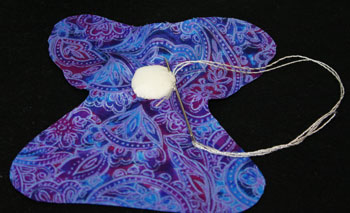
On the opposite side, end the stitches, tie a knot and leave 3/4 inch at the end for hair.
Match the two Easy Angel Crafts Quilter's Angel shapes together with the right sides facing each other.
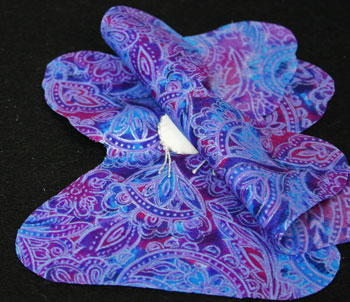
Pin the shapes together.
Thread the sewing needle with the thread and knot one end.
Begin the stitches at the bottom corner.
Thread the sewing needle with the thread and knot one end.
Begin the stitches at the bottom corner.
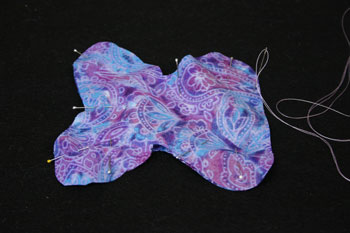
Stitch around the shape 1/4 inch from the edge using small running stitches.
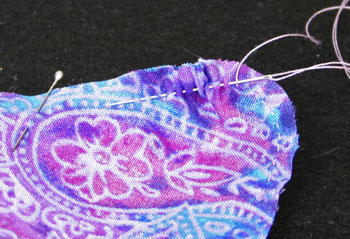
Stitch the side, around the top and down the other side.
Stop after the stitches go around the opposite corner of the bottom.
The opening needs to be large enough to turn the shape right side out.
Stop after the stitches go around the opposite corner of the bottom.
The opening needs to be large enough to turn the shape right side out.
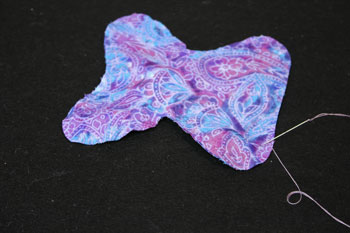
Clip the corners and curves to allow the shape to lay flat when turned being careful not to clip the stitches.
Turn the shape right side out.
Use the needle to help pull the seam flat before pressing.
Use the needle to help pull the seam flat before pressing.
Press the shape flat making sure the corners and curves lay flat.
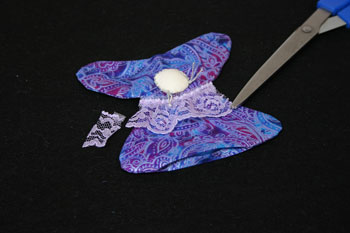
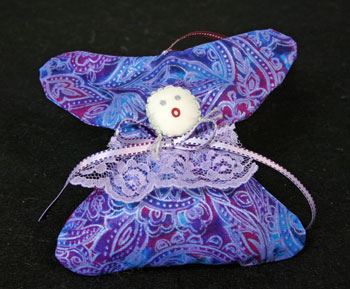
Position the lace across the narrow part of the angel shape.
Pin the lace in place.
Thread the needle with the sewing thread and knot one end.
Use a small running stitch to attach the top of the lace to the Easy Angel Crafts Quilter's Angel.
Make sure the stitches go through all of the layers.
Position the lace across the narrow part of the angel shape.
Pin the lace in place.
Thread the needle with the sewing thread and knot one end.
Use a small running stitch to attach the top of the lace to the Easy Angel Crafts Quilter's Angel.
Make sure the stitches go through all of the layers.

Finish stitching the lace and knot the thread close to the last stitch.
Trim any excess lace from the edges.
Trim any excess lace from the edges.
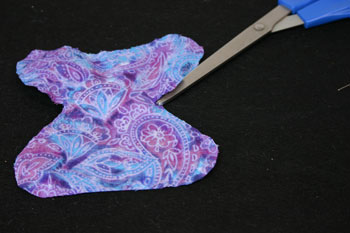
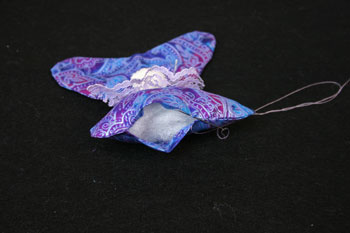
Insert fiberfill (or cotton balls) in the bottom of the angel.
Use small stitches with the needle and thread to sew the edges of the opening together.
Knot the thread close to the last stitch.
Use small stitches with the needle and thread to sew the edges of the opening together.
Knot the thread close to the last stitch.
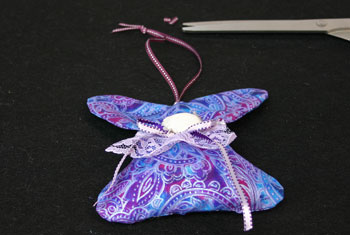
Make a bow in the ribbon to highlight the neck of the Easy Angel Crafts Quilter's Angel.
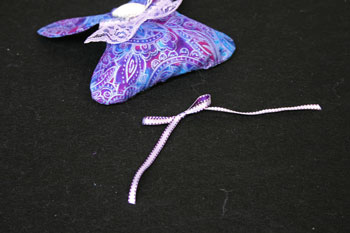
Position the bow just below the yo-yo face and attach using small hidden stitches.
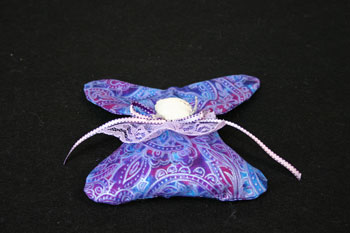
Fold the remaining ribbon in half and sew the folded end to the middle of the top of the angel.
Make a knot in the ends of the ribbon and trim the ends at an angle.
Make a knot in the ends of the ribbon and trim the ends at an angle.
Using paint pens, ink pens or cosmetic pens, draw eyes and a mouth on the face.
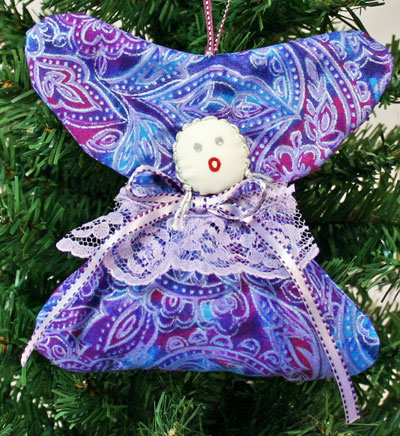
The Easy Angel Crafts Quilter's Angel is finished and singing.
She sings hanging on the Christmas tree, a drawer pull, a cabinet knob or where a singing angel is needed.
The sewing steps for the Easy Angel Crafts Quilter's Angel are simple. If you prefer, several of the steps can be completed on a sewing machine.
As an alternative, curling ribbon would make great angel hair.
Have fun!
Though the materials are simple, different fabrics, lace, ribbons and hair techniques produce a variety of the Easy Angel Crafts Quilter's Angel for your home, for gifts or for craft sales.
As an alternative, curling ribbon would make great angel hair.
Have fun!
Though the materials are simple, different fabrics, lace, ribbons and hair techniques produce a variety of the Easy Angel Crafts Quilter's Angel for your home, for gifts or for craft sales.


funEZcrafts
Welcome
Come on in and stay awhile...

funEZcrafts
Welcome
Come on in and stay awhile...