Easy Angel Crafts: Paper Cone Angel
With a few pieces of paper, scissors and the template, you can easily make one Easy Angel Crafts Paper Cone Angel or a whole choir of singing angels.
Let's look at the materials and the steps for how to make the paper cone angel:
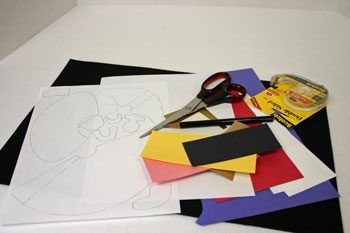
Easy Angel Crafts: Paper Cone Angel Materials and Tools:
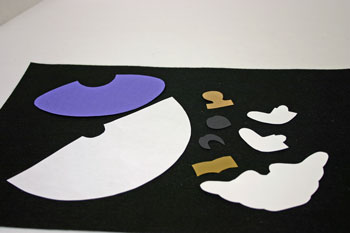
Pieces of paper of your choice [These angels are made with scraps of several types of paper: white printer paper for the body, construction paper for the robes and hair, white presentation paper (slightly heavier paper) for the arms and wings, gold wrapping paper for the hymnal, cream colored index card for one face and craft paper for the other.] Inexpensive construction paper would be a good choice for all of the pieces.
Tape or glue (These angels were constructed with double sided tape.)
Scissors
Pencil or pen
Paper cone angel pattern (click here for the Easy Angel Crafts Paper Cone Angel pattern)
Tape or glue (These angels were constructed with double sided tape.)
Scissors
Pencil or pen
Paper cone angel pattern (click here for the Easy Angel Crafts Paper Cone Angel pattern)
The Steps for How to Make the Easy Angel Crafts: Paper Cone Angel:
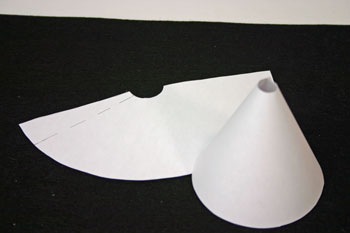
Print a copy of the Easy Angel Crafts Paper Cone Angel pattern template.
Cut out all of the shapes from the printed pattern.
Cut out all of the shapes from the printed pattern.
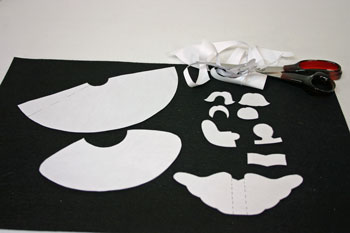
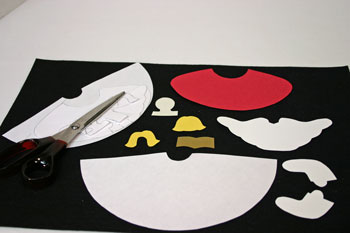
Using the pattern pieces, cut around each shape in the paper you selected for each piece.
Remember to cut two of the arm shapes.
For each angel, only one set of front and back hair is needed - either the two longer shapes or the two shorter hair shapes.
Remember to cut two of the arm shapes.
For each angel, only one set of front and back hair is needed - either the two longer shapes or the two shorter hair shapes.
Make the cone shape to form the Easy Angel Crafts Paper Cone Angel's body.
The broken line on the pattern shows where the edges of the paper should overlap.
Tape or glue the overlapped paper together to hold the cone shape.
The broken line on the pattern shows where the edges of the paper should overlap.
Tape or glue the overlapped paper together to hold the cone shape.
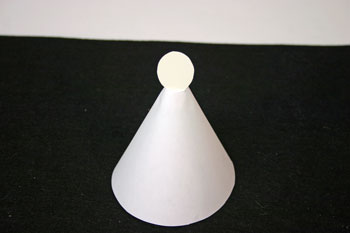
Bend the tabs on the bottom of the head shape and insert the bottom of the head shape into the top of the cone shape.
The cone's overlapping edge should be at the back of the head shape.
The tabs will hold the head shape inside the cone, but if desired, you can attach the tabs to the inside of the cone with tape or glue.
The cone's overlapping edge should be at the back of the head shape.
The tabs will hold the head shape inside the cone, but if desired, you can attach the tabs to the inside of the cone with tape or glue.
Wrap the robe shape around the cone with the center of the robe positioned over the lapped paper edges at the back of the cone shape.
Place the robe shape 3/4 to 1 inch below the top edge of the cone.
The top corners of the front of the robe should be open, or just touch, but not overlap.
Place the robe shape 3/4 to 1 inch below the top edge of the cone.
The top corners of the front of the robe should be open, or just touch, but not overlap.

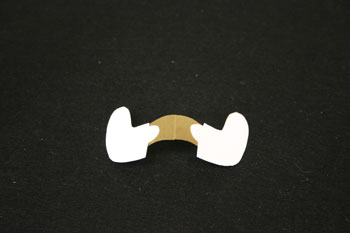
Fold the hymnal shape in half.
Lay the two arm shapes opposite each other.
Position the folded hymnal between the two arms with the curves going upward.
This step makes sure that you position the arms with a right and left rather than two rights or two lefts.
Lay the two arm shapes opposite each other.
Position the folded hymnal between the two arms with the curves going upward.
This step makes sure that you position the arms with a right and left rather than two rights or two lefts.

With tape or glue, attach the hymnal to the inside of each hand.
Position the arms just above the edge of the robe on either side of the head.
Tape or glue the arms to the angel shape at the shoulder.
Tape or glue the arms to the angel shape at the shoulder.
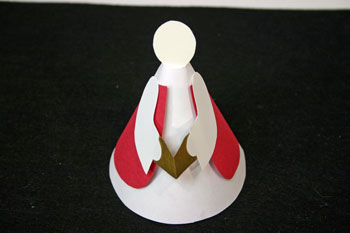
Position the full hair shape on the back of the Easy Angel Crafts Paper Cone Angel's head and attach with glue or tape.
Match the front hair shape to the back over the face and attach.
With a pencil or pen, add the eyes and mouth to the Easy Angel Crafts Paper Cone Angel's face.
It would be easier to add these before the head is inserted into the top of the cone, but the face could become smudged while completing the rest of the angel.
Plus, the attachment of the hair determines where the face should be.
It would be easier to add these before the head is inserted into the top of the cone, but the face could become smudged while completing the rest of the angel.
Plus, the attachment of the hair determines where the face should be.
Using the dotted lines on the wing pattern as a visual guide, fold the angel's wings to form the base of the wings.
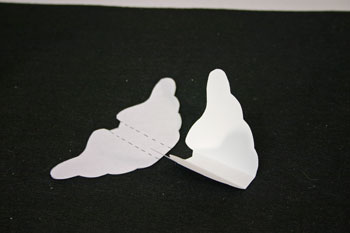
Attach the base of the wings to the back of the Easy Angel Crafts Paper Cone Angel with tape or glue.
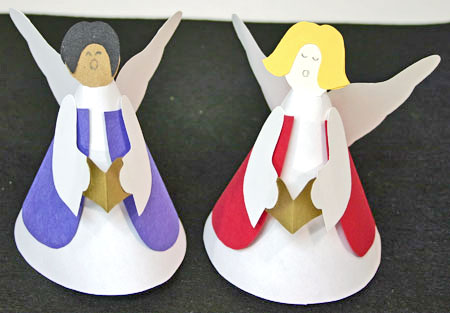
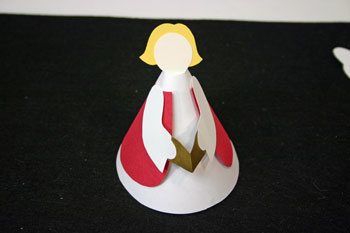
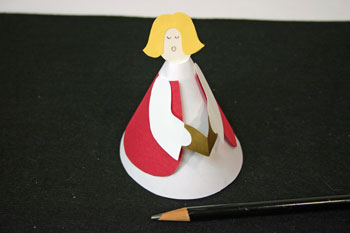
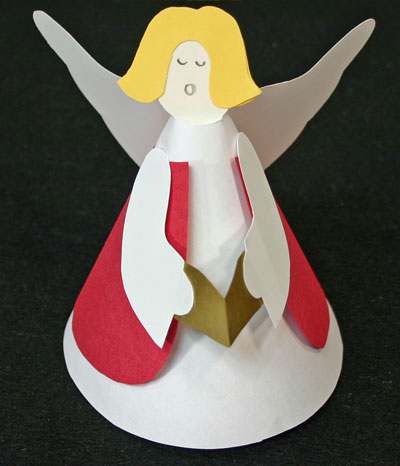
This pretty Easy Angel Crafts Paper Cone Angel sings from her choir book.
This pretty Easy Angel Crafts Paper Cone Angel sings from her choir book.
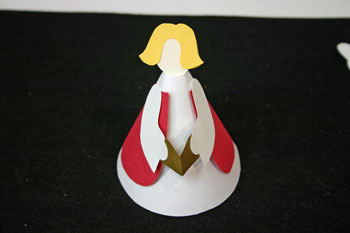
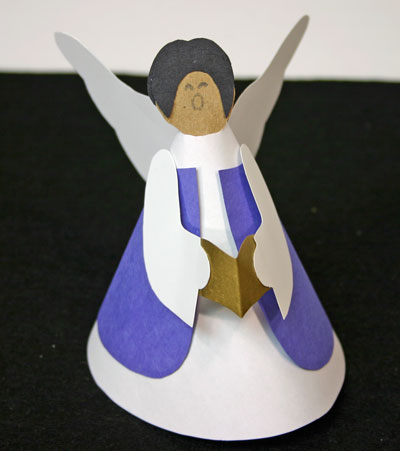
The second angel uses different papers for the robe, face and hair along with the shorter front and back hair shapes.
Follow the same steps above to construct the second Easy Angel Crafts Paper Cone Angel.
Using similar paper colors or a variety of different colors, you can make an Easy Angel Crafts Paper Cone Angel choir.
Your angel or angel choir can sing on a table or other flat surface.
Or, with the addition of some string, your angels can sing hanging from a tree, a cabinet door knob or other object.
Have fun!
Inexpensive, easy and fun, the Easy Angel Crafts Paper Cone Angel project provides enjoyment to children and adults alike.
Or, with the addition of some string, your angels can sing hanging from a tree, a cabinet door knob or other object.
Have fun!
Inexpensive, easy and fun, the Easy Angel Crafts Paper Cone Angel project provides enjoyment to children and adults alike.


funEZcrafts
Welcome
Come on in and stay awhile...

funEZcrafts
Welcome
Come on in and stay awhile...