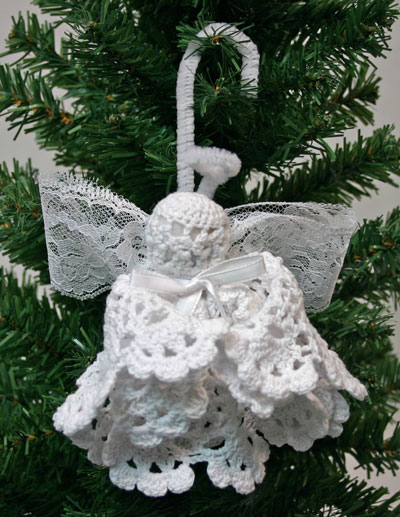
Easy Angel Crafts: Doily Angel
This Easy Angel Crafts Doily Angel quickly comes to life with a few simple materials along with a few minutes.
The doily angel can sit or hang adding pleasure to your decorations. (The steps are very similar to the Easy Angel Crafts Handkerchief Angel.)
The doily angel can sit or hang adding pleasure to your decorations. (The steps are very similar to the Easy Angel Crafts Handkerchief Angel.)
Let's look at the materials and the steps for how to make the doily angel:
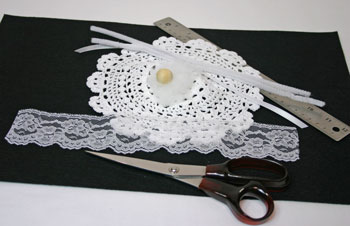
Easy Angel Crafts: Doily Angel Materials and Tools:
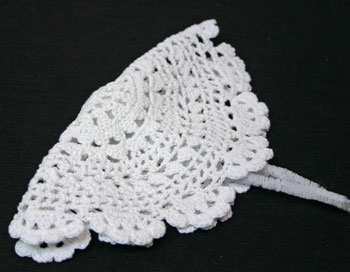
Doily - 8 inch diameter
Chenille wires - two white, each 12 inches long
Wooden bead 3/4 inch diameter (optionally, you can just use more fiberfill or cotton instead of the bead)
White ribbon 8 inches long by 1/4 to 3/8 inch wide
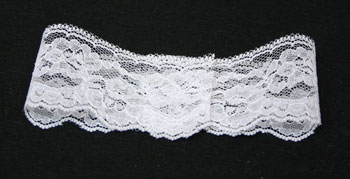
Lace 12 inches long by 1 3/4 to 2 inches wide
Fiberfill - small amount or cotton ball(s)
Ruler
Scissors
Chenille wires - two white, each 12 inches long
Wooden bead 3/4 inch diameter (optionally, you can just use more fiberfill or cotton instead of the bead)
White ribbon 8 inches long by 1/4 to 3/8 inch wide
Lace 12 inches long by 1 3/4 to 2 inches wide
Fiberfill - small amount or cotton ball(s)
Ruler
Scissors
The Steps for How to Make the Easy Angel Crafts: Doily Angel:
Cut the lengths of ribbon and lace - eight inches for the narrow ribbon and 12 inches of the lace.
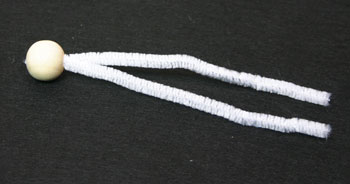
Fold one of the chenille wires in half.
Push the folded end into the wooden doll's head. (If you are not using the wooden doll's head, insert the folded wire into the middle of the fiberfill.)
Fold one of the chenille wires in half.
Push the folded end into the wooden doll's head. (If you are not using the wooden doll's head, insert the folded wire into the middle of the fiberfill.)
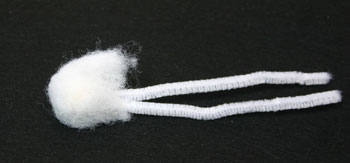
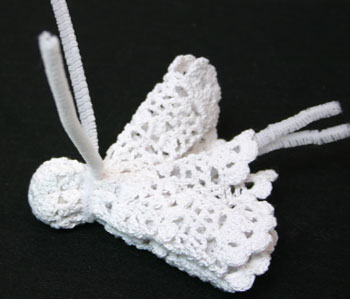
Wrap the fiberfill around the wooden doll's head.
Insert the fiberfill wrapped head into the middle of the doily and fold the doily in half over the head.
Using the second chenille wire, wrap it around the doily just below the ball and twist the wire to form the neck of the Easy Angel Crafts Doily Angel.
Fold the lace with the overlapping ends in the middle.
Position the folded lace between the two ends of chenille wire at the angel's neck.
Place the overlapped ends of the lace toward the doily.
Twist the chenille wire around the lace to hold it firmly against the doily.
Place the overlapped ends of the lace toward the doily.
Twist the chenille wire around the lace to hold it firmly against the doily.
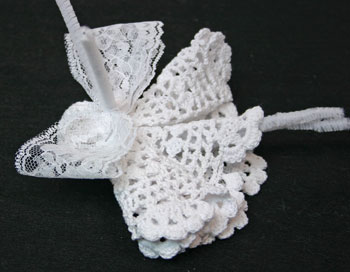
Wrap the white ribbon around the neck of the angel over the chenille wire.
Tie a bow on the side opposite the lace wings.
Tie a bow on the side opposite the lace wings.
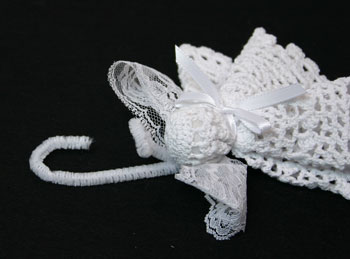
Wrap one of the chenille wire ends around your finger to form a halo.
Join the end of the wire back on itself to complete the circle.
For the other end of the chenille wire, form a half circle to be used as a hanger.
Fold this second wire down if you prefer your angel sitting on a mantle or other surface rather than hanging on a tree.
Join the end of the wire back on itself to complete the circle.
For the other end of the chenille wire, form a half circle to be used as a hanger.
Fold this second wire down if you prefer your angel sitting on a mantle or other surface rather than hanging on a tree.
Fold the doily back to reveal the two inner pieces of chenille wire.
Form the wire ends into a circle.
Join the ends by overlapping and bending the wires.
The circle should be large enough for the doily to overlap and meet in the middle forming the Easy Angel Crafts Doily Angel's arms with clasped hands.
Form the wire ends into a circle.
Join the ends by overlapping and bending the wires.
The circle should be large enough for the doily to overlap and meet in the middle forming the Easy Angel Crafts Doily Angel's arms with clasped hands.
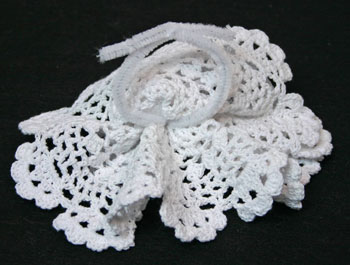
Fold the doily back over the chenille circle with the edges of the doily meeting in the middle front.
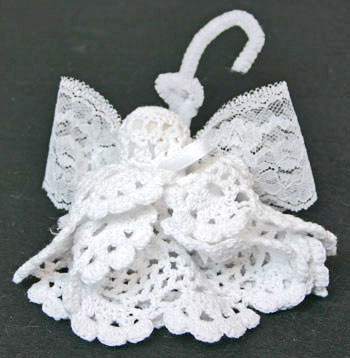
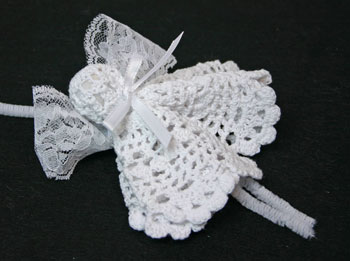
The doily angel looks pretty sitting or hanging.
This version of the Easy Angel Crafts Doily Angel can be made quickly and easily. It also can be quickly deconstructed if you need the doily or any of the materials for other projects later.
Have fun!
This Easy Angel Crafts Doily Angel is easy, quick and fun to make for children and adults alike.
Have fun!
This Easy Angel Crafts Doily Angel is easy, quick and fun to make for children and adults alike.


funEZcrafts
Welcome
Come on in and stay awhile...

funEZcrafts
Welcome
Come on in and stay awhile...