Easy Angel Crafts: Curved Paper Angel
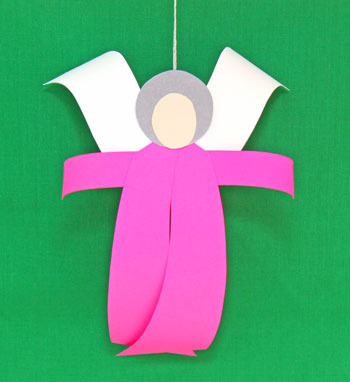
The Curved Paper Angel is a fun and easy project that uses bits of paper, basic tools and simple shapes to become a minimalist yet pretty angel.
This version is made with bright pink paper.
This version is made with bright pink paper.
Let's look at the materials and the steps for how to make this simple and interesting angel:
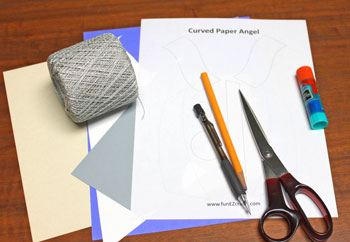
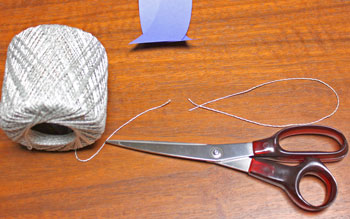
Easy Angel Crafts: Curved Paper Angel Materials and Tools:
Paper - four colors - robe, wings, halo, face. (I used scraps of medium weight cardstock for the angel's robe, halo and wings and construction paper for the face.)
Yarn
Glue
Scissors
Pencil
Round object for burnishing (I used a round pencil.)
Curved Paper Angel pattern
Yarn
Glue
Scissors
Pencil
Round object for burnishing (I used a round pencil.)
Curved Paper Angel pattern
The Steps for How to Make the Easy Angel Crafts: Curved Paper Angel:
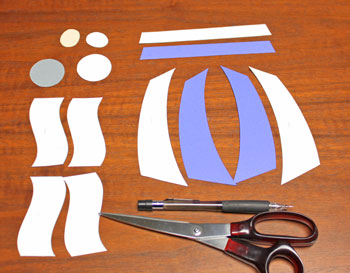
Print the Curved Paper Angel pattern.
Cut around the printed pattern shapes.
Trace and cut the pattern shapes from the four papers.
If your paper is decorated differently on the front and back, make sure the shapes are cut to have the designs showing correctly - for example, the wing shapes should be mirror images to have the similar designs showing properly.
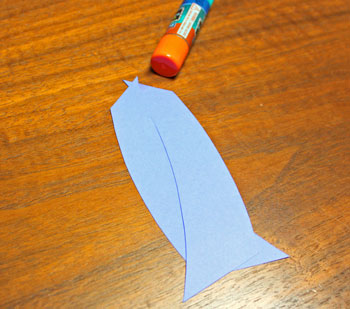
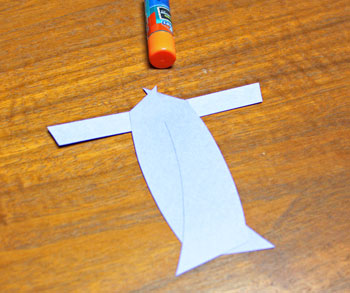
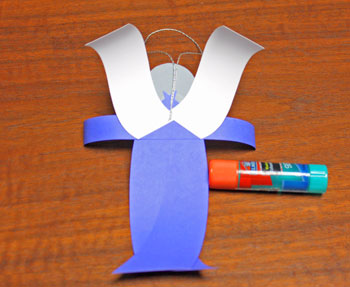
Position the two body shapes with the inner curves facing each other.
Overlap the top points left over right with the larger bottom areas overlapped right over left.
Apply a small amount of glue between the top overlapped area to glue the pieces together.
Overlap the top points left over right with the larger bottom areas overlapped right over left.
Apply a small amount of glue between the top overlapped area to glue the pieces together.
Apply glue to the front center portion of the arm shape.
With the longer edge toward the top, position the arm shape centered behind the angel shape.
The top of the arm shape should be at the angled "shoulder" point on either side of the body shape.
Press the shapes together and allow the glue to set.
With the longer edge toward the top, position the arm shape centered behind the angel shape.
The top of the arm shape should be at the angled "shoulder" point on either side of the body shape.
Press the shapes together and allow the glue to set.
Apply glue to a small portion of the halo shape on its back side.
Position and glue the halo over the top points of the body shape.
Position and glue the halo over the top points of the body shape.
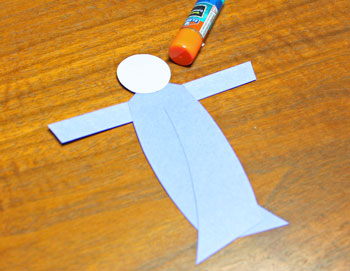
Add glue to the back of the face shape.
Position the bottom edge of the facial oval even with the bottom edge of the halo.
Press together.
Position the bottom edge of the facial oval even with the bottom edge of the halo.
Press together.

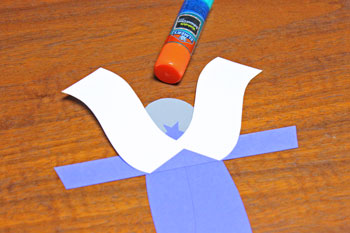
Turn the angel shape over.
Add glue on the front bottom edge of the wing shapes.
Position each wing shape at an angle away from the head with the curved points on the outside.
Press the edges of the wings to the body shape to attach the glue.
Add glue on the front bottom edge of the wing shapes.
Position each wing shape at an angle away from the head with the curved points on the outside.
Press the edges of the wings to the body shape to attach the glue.
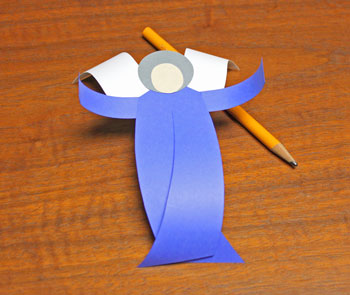
Use a round object to burnish the paper shapes.
Burnishing is much like pulling scissors across curling ribbon.
However, scissors tend to form a crease when trying to burnish the paper.
The round object forms a curl as you pull it across the paper.
Pull the round object on the back of the wings and the body shapes to curve the shapes backwards.
Pull the round object along the front of the arms from the shoulder to the fingers to curve the arms forward.
Cut a length of yarn 10 to 14 inches long.
Fold the yarn in half.
Apply glue to the cut ends of the yarn.
Press the ends in the center between the wing shapes and allow the glue to dry.
Apply glue to the cut ends of the yarn.
Press the ends in the center between the wing shapes and allow the glue to dry.
The Curved Paper Angel is finished and ready to display.
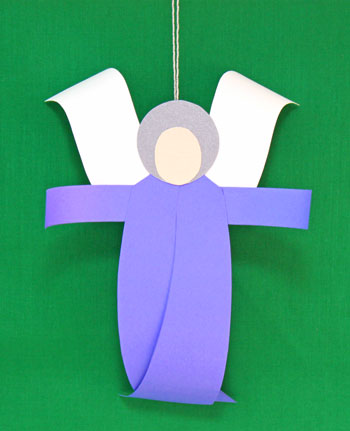
Simple curved shapes with additional burnished curves become a fun and pretty angel.
Choose the colors you prefer for your angel - bright or subdued, wild or sedate - the choices are almost endless.
Also, if you are good at drawing faces, your little angel would appreciate a face with eyes, a smile and some character.
Have fun making one or many!
The Curved Paper Angel is a simple and fast project that anyone can enjoy throughout the year.

funEZcrafts
Welcome
Come on in and stay awhile...

funEZcrafts
Welcome
Come on in and stay awhile...
