Easy Christmas Crafts: Paper Light Bulb Star
The Paper Light Bulb Star uses brightly colored paper cut in shapes of Christmas light bulbs to become a fun and inexpensive decoration.

Easy Christmas Crafts: Paper Light Bulb Star Materials and Tools:
Paper (brightly colored card stock in red, yellow, blue and green along with silver or gray for base of the bulbs and white for the backing)
Yarn
Scissors
Glue
Pencil
Pattern - Paper Light Bulb Star pattern (click to open Adobe PDF)
Yarn
Scissors
Glue
Pencil
Pattern - Paper Light Bulb Star pattern (click to open Adobe PDF)
Take a look at the simple materials and tools. (I'm using scraps from other projects.)

The Steps for How to Make the Easy Christmas Crafts: Paper Light Bulb Star:
Print the Paper Light Bulb Star pattern.
Cut around the light bulb shape, the doughnut shape and the bulb base shape.
Mark and cut around the bulb shape on the red, yellow, blue and green papers to make two of each color.
Mark and cut around the base shape eight times on the silver or gray paper.
The squiggles on the sides of the base represent the threads on a real bulb base. The small curvy cuts do not have to be exact, just a representation of the threads. Same for the small rounded point on the bottom of the base.
Mark and cut around the doughnut shape on the white paper making just one of the doughnut shape.
Cut a piece of yarn 8 to 10 inches in length for the hanging loop.

On the doughnut shape, make small marks on the inner edge to match the lines on the pattern.

Position the bottom of the bulbs roughly 1/8-inch from the inner circle.
Use the marks to place the bulbs equidistant from each other around the circle.
Glue the bulb shapes to the doughnut.
Use the marks to place the bulbs equidistant from each other around the circle.
Glue the bulb shapes to the doughnut.

Place glue on the back of each bulb base and position over each of the bulb shapes.

Turn the Paper Light Bulb Star over.
Fold the yarn in half.
Add glue to the cut ends of the yarn and position over the back of one of the bulbs - whichever one you want to be in the top position.
Fold the yarn in half.
Add glue to the cut ends of the yarn and position over the back of one of the bulbs - whichever one you want to be in the top position.

Here's the hard part, let the glue dry.

The Paper Light Bulb Star is finished and ready to display.
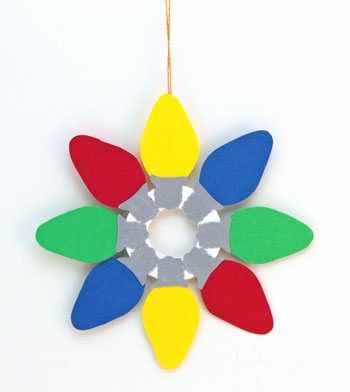
This ornament is simple, yet its bright colors catch the eye.
Add creativity with different colors or even all the same color. The choices are many!
And, here's another idea: add clear sparkle paint to the bulbs for more variety and interest.
The Paper Light Bulb Star is a fun project for the young and the young at heart. It can also be a fun group project.
Add creativity with different colors or even all the same color. The choices are many!
And, here's another idea: add clear sparkle paint to the bulbs for more variety and interest.
The Paper Light Bulb Star is a fun project for the young and the young at heart. It can also be a fun group project.


funEZcrafts
Welcome
Come on in and stay awhile...

funEZcrafts
Welcome
Come on in and stay awhile...