Easy Paper Crafts: Faux Stained Glass
Are you looking for a simpler faux stained glass paper crafts project that doesn't create a hassle to set up, to do and to clean up?
Here's an easy paper crafts project showing how to make a faux stained glass.
What about a pretty faux stained glass window framed and placed in front of a lamp or sunny window?
Here's an easy paper crafts project showing how to make a faux stained glass.
What about a pretty faux stained glass window framed and placed in front of a lamp or sunny window?
This project uses similar materials to other faux stained glass paper crafts projects but is easier.
Plus, depending on which materials you choose or have on hand, it does not require an iron!
Plus, depending on which materials you choose or have on hand, it does not require an iron!
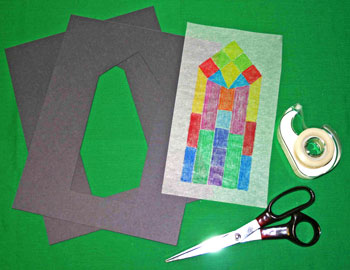
Easy Paper Crafts: No-Mess Faux Stained Glass Materials and Tools:
Tracing paper
Crayons
Construction paper
Pencil
Scissors
Tape
Pattern ( Faux Stained Glass - Vertical Window or Faux Stained Glass - Arched Window or Faux Stained Glass - Heart)
Frame - 8.5 x 11 inch clear acrylic (optional)
Crayons
Construction paper
Pencil
Scissors
Tape
Pattern ( Faux Stained Glass - Vertical Window or Faux Stained Glass - Arched Window or Faux Stained Glass - Heart)
Frame - 8.5 x 11 inch clear acrylic (optional)
The Steps for How to Make the Easy Paper Crafts: No-Mess Faux Stained Glass:
If you do not have tracing paper, you can use either waxed paper or parchment paper from your kitchen.
However, you need to iron the waxed paper or parchment paper between two clean paper towels BEFORE you start the coloring process to remove some of their waxed coatings.
Basically, the waxy coatings on both the waxed paper and the parchment paper prevent the crayon from adhering to their surfaces. (Their non-stick properties is one of the reasons we use the papers in the kitchen.)
But, you can get a lot of the waxy coating off the paper by ironing it between two paper towels with a hot, dry iron.
Continue the ironing process until the paper is not as slick and feels almost rough. (Be careful not to burn your fingers!)
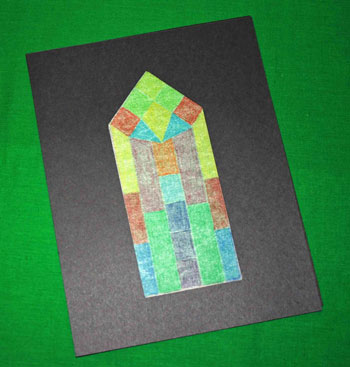
Now, to begin your Easy Paper Crafts: No-Mess Faux Stained Glass, place your printed pattern on your work surface with the drawn pattern facing upward.
However, you need to iron the waxed paper or parchment paper between two clean paper towels BEFORE you start the coloring process to remove some of their waxed coatings.
Basically, the waxy coatings on both the waxed paper and the parchment paper prevent the crayon from adhering to their surfaces. (Their non-stick properties is one of the reasons we use the papers in the kitchen.)
But, you can get a lot of the waxy coating off the paper by ironing it between two paper towels with a hot, dry iron.
Continue the ironing process until the paper is not as slick and feels almost rough. (Be careful not to burn your fingers!)
Now, to begin your Easy Paper Crafts: No-Mess Faux Stained Glass, place your printed pattern on your work surface with the drawn pattern facing upward.
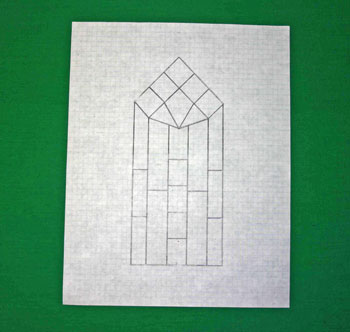
Next, lay your tracing paper over the pattern totally covering the area of the printed pattern.
Select the crayon colors you want to use for your faux stained window.
The medium to darker tones work best.
The guidelines of the pattern will be visible through the tracing paper.
Color each block making sure the area is completely filled with your colors.
On the outer edges, you may want to (horrors!) color outside the line such that your project does not have any non-colored areas when framed.
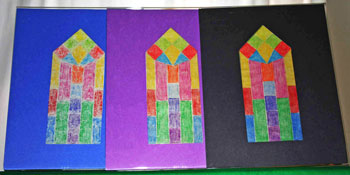
This picture shows how each of the three papers look after being colored.
The left window shows the tracing paper. The center example illustrates the waxed paper with the right example being parchment paper.
Select the crayon colors you want to use for your faux stained window.
The medium to darker tones work best.
The guidelines of the pattern will be visible through the tracing paper.
Color each block making sure the area is completely filled with your colors.
On the outer edges, you may want to (horrors!) color outside the line such that your project does not have any non-colored areas when framed.
This picture shows how each of the three papers look after being colored.
The left window shows the tracing paper. The center example illustrates the waxed paper with the right example being parchment paper.

The tracing paper without the wax coating accepts the colors better and is more consistent.
The center waxed paper is almost as good, but some wax remains and prevents the consistency of the colors.
The right parchment paper holds much of its wax even after repeated ironing, though the effect is interesting.
The colors appear softer and somewhat blurred.
Next in the process, cut your pattern along the outer edge. (You may want to print a second copy for this.)
This becomes the outline to cut out of your construction paper to make the front and back frames.
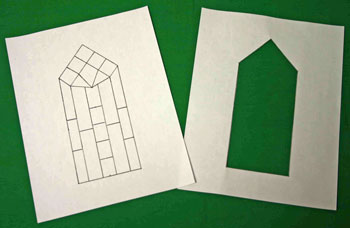
You want to cut a contrasting frame out of construction paper to hold your stained glass window.
You need two pieces to sandwich the stained glass window between.
The construction papers can be the same color or different colors - your choice.
If you plan to place your finished window in an acrylic frame, you need to cut the construction paper to fit the frame.
The one above was 8.5 x 11 whereas the construction paper was 9 x 12 before being cut.
After sizing your construction paper, position your open pattern over the construction paper.
Using a pencil, carefully draw the outline of the area to be cut out on the construction paper.
Do this for each of the two sheets. Make sure you position and draw the open pattern the same way on both sheets.
Following your pencil marks, cut out the window shapes in each piece of the construction paper.
In the next step, tape the faux stained glass window to the back of one of the construction paper frames.
Position the stained glass paper such that the colored window fits inside the cut out area.
Position the stained glass paper such that the colored window fits inside the cut out area.

Position the second construction paper frame behind the first making sure the openings match.
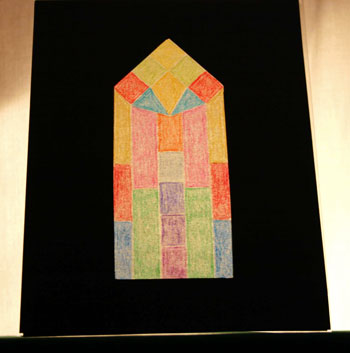
If you do not use an acrylic frame, tape the two construction paper frames together then place on a sunny window or in front of a light source such as a lamp.
In an acrylic frame, the frame holds the construction frame and the stained glass window in place.
In an acrylic frame, the frame holds the construction frame and the stained glass window in place.
To see the difference between the three types of paper, take a look at these side-by-side comparisons, illuminated from the front and from the back.
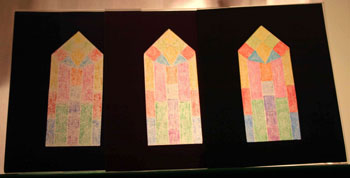
In these pictures, the left or blue frame shows the parchment paper, the middle or purple frame includes the waxed paper and the right or black frame illustrates the tracing paper version.
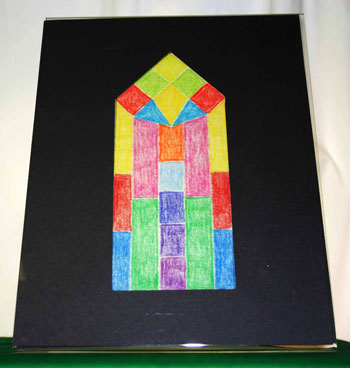
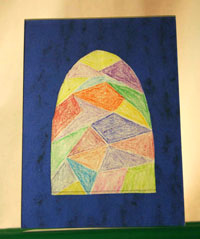
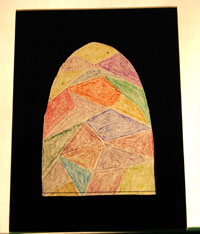
For a couple of other versions, here are two 5 x 7 inch faux stained glass windows.
First, an arched window using strong colors:
For a couple of other versions, here are two 5 x 7 inch faux stained glass windows.
First, an arched window using strong colors:
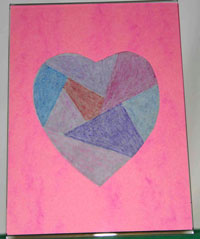
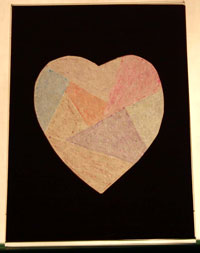
Second, a heart shape using soft colors:
Or, you can make your own pattern from a coloring book or pretty picture, then follow the same steps as shown above.
This makes a great project for children of all ages and can be great gifts for young children to make for grandparents or other special people in their lives.
Enjoy!
This makes a great project for children of all ages and can be great gifts for young children to make for grandparents or other special people in their lives.
Enjoy!


funEZcrafts
Welcome
Come on in and stay awhile...

funEZcrafts
Welcome
Come on in and stay awhile...