Easy Paper Crafts: Bookmarks
Do you like to read or know someone who does?
Do you like to share books with others?
How about making simple and inexpensive yet elegant bookmarks for yourself or for gifts?
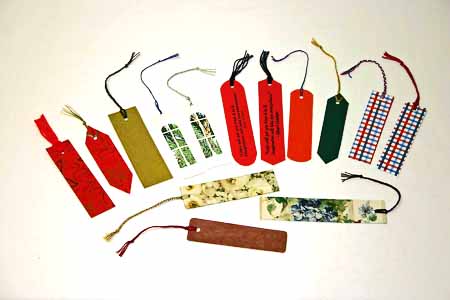
Here's an easy paper crafts project showing how to make a variety of bookmarks using simple materials and tools.
Do you like to share books with others?
How about making simple and inexpensive yet elegant bookmarks for yourself or for gifts?
Here's an easy paper crafts project showing how to make a variety of bookmarks using simple materials and tools.
You can make simple rectangular shapes or you can download our patterns and choose the shape you prefer.
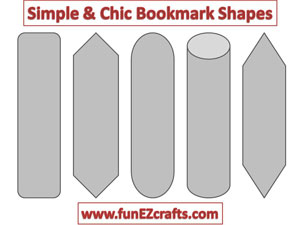
Click on this link for the file: Easy Paper Crafts - Bookmarks - Shapes
Now, let's take a look at each different type of bookmark and the materials used.
Now, let's take a look at each different type of bookmark and the materials used.
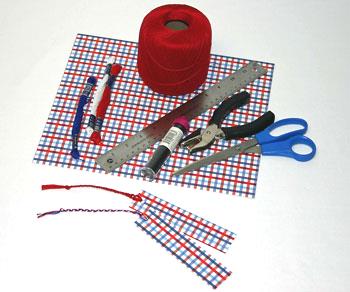
Easy Paper Crafts: Card Stock Bookmarks Materials and Tools:
Paper - card stock with both sides the same color - or, you can glue two pieces together
Scissors
Yarn
Round object (to help with yarn braiding)
Straight edge or pattern
Hole punch
Scissors
Yarn
Round object (to help with yarn braiding)
Straight edge or pattern
Hole punch
The Steps for How to Make the Easy Paper Crafts: Card Stock Bookmarks:
These card stock bookmarks are simple rectangular shapes with a braided tassel.
The bookmarks are 1.375 x 5.5 inches and their thin but sturdy shape work well for paperback books.
The bookmarks are 1.375 x 5.5 inches and their thin but sturdy shape work well for paperback books.
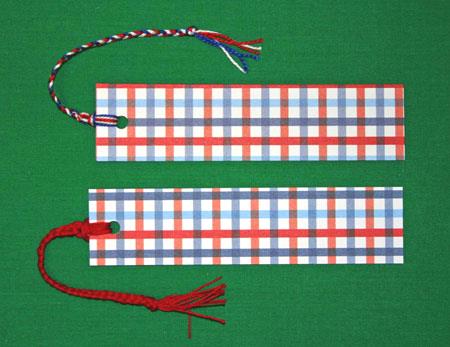
For the braid, select your yarn and cut strands 40 inches long in multiples of three.
For the tassels shown, three strands of the thicker red yarn were used.
For the red, white and blue braid, two strands of each of the three colors were used.
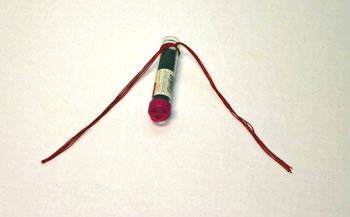
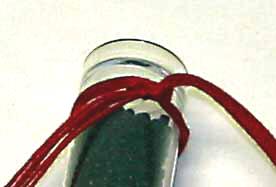
Wrap the yarns around a round object at least 3/4 inch in diameter.
This will build the loop to attach to the bookmark.
You must be able to slide the braid off the round object when finished.
(The object shown here is a container of seed beads. The cap would prevent removing the braid, but the smooth bottom allows the braid to slide off.)
For the tassels shown, three strands of the thicker red yarn were used.
For the red, white and blue braid, two strands of each of the three colors were used.
Wrap the yarns around a round object at least 3/4 inch in diameter.
This will build the loop to attach to the bookmark.
You must be able to slide the braid off the round object when finished.
(The object shown here is a container of seed beads. The cap would prevent removing the braid, but the smooth bottom allows the braid to slide off.)
Tie a square knot in the yarn prior to starting the braid.
Divide the yarn threads into three sections and braid as normal.
Make your braid slightly longer than you want such that you can tie a knot in the braided section.
Make your braid slightly longer than you want such that you can tie a knot in the braided section.
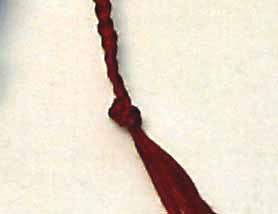
After you knot the end, pull the end threads apart and cut them to the length you desire.
The fringe on these braids is 1.25 inches.
When you finish the braid, slide it off the round object.
Cut a round hole in the card stock bookmark 3/8 inch from the end and centered across the card stock.
Insert the loop through the hole in the bookmark then pull the tasseled end through the loop.
The fringe on these braids is 1.25 inches.
When you finish the braid, slide it off the round object.
Cut a round hole in the card stock bookmark 3/8 inch from the end and centered across the card stock.
Insert the loop through the hole in the bookmark then pull the tasseled end through the loop.
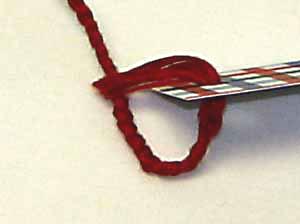
Pull the end until the loop snugly fits the end of the bookmark.
Your easy paper crafts card stock bookmark with braided tassel is finished!
Your easy paper crafts card stock bookmark with braided tassel is finished!
Let's look at another bookmark.
Easy Paper Crafts: Wallpaper Bookmarks Materials and Tools:
Paper - wallpaper or wallpaper border
Scissors
Yarn
Round object (to help with yarn braiding)
Straight edge
Hole punch
Scissors
Yarn
Round object (to help with yarn braiding)
Straight edge
Hole punch
The Steps for How to Make the Easy Paper Crafts: Wallpaper Bookmarks:
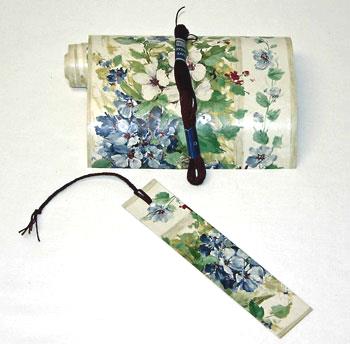
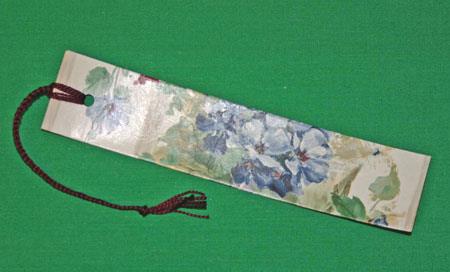
This is a simple but beautiful bookmark made from a wallpaper border.
Cut a straight edge on the end of the border paper.
Measure over such that you can you can fold into thirds overlapping in the back.
Cut straight across the border.
This wallpaper bookmark measures 1.5 inches wide when folded and finished.
Therefore, the cut size of the wallpaper border was 4.5 inches.
The wallpaper border width was seven inches which became the length of the bookmark.
This time, let's look at one made with regular 8.5 x 11 printer paper.
Easy Paper Crafts: Computer Printed Bookmarks Materials and Tools:
Paper - regular 8.5 x 11 paper in white or color
Computer application to generate text or quote
Printer to print the page
Glue
Yarn
Scissors
Straight edge or pattern
Hole punch
Computer application to generate text or quote
Printer to print the page
Glue
Yarn
Scissors
Straight edge or pattern
Hole punch
The Steps for How to Make the Easy Paper Crafts: Computer Printed Bookmarks:
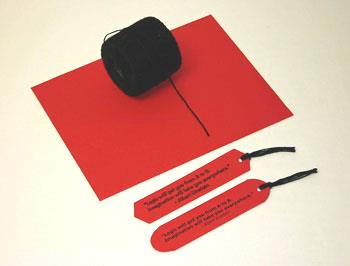
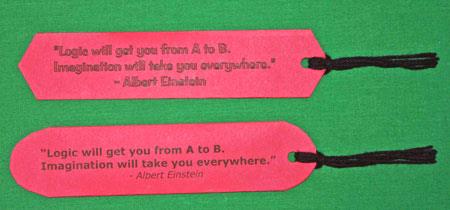
These are simple bookmarks but become powerful with the message you print on them.
Here, we've used the quote by Albert Einstein, "Logic will get you from A to B. Imagination will take you everywhere."
Think about it, don't books use your imagination?
Whether for pleasure or personal growth, books take you everywhere.
Or, if giving these as a gift, perhaps you want to add a personal message for the recipient.
Be creative with your own message or find an appropriate quote for your gift!
Select your message and enter it into your computer application.
Based on the size of your quote, set the font to be large enough to be read and fit within the size of the bookmark.
Position the text in the application such that when printed there will be enough margin on either side of the quote for three equal layers.
Print your quote and cut to size.
These are 1.5 inches wide completed, therefore the paper was 4.5 inches before folding.
Fold the paper to make the three layers.
Apply glue to the inside and to the layers.
Place the bookmark between two flat relatively heavy objects (e.g., books) to help the glue adhere the layers.
Now, let's take a look at a tissue paper bookmark.
Easy Paper Crafts: Tissue Paper Bookmarks Materials and Tools:
Paper - pretty tissue paper from gift package or pretty napkin
Cardboard - poster board or index card
Glue
Yarn
Scissors
Round object (to help with yarn braiding)
Straight edge or pattern
Hole punch
Cardboard - poster board or index card
Glue
Yarn
Scissors
Round object (to help with yarn braiding)
Straight edge or pattern
Hole punch
The Steps for How to Make the Easy Paper Crafts: Tissue Paper Bookmarks:
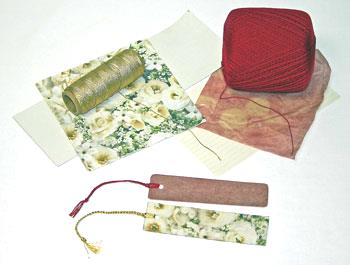
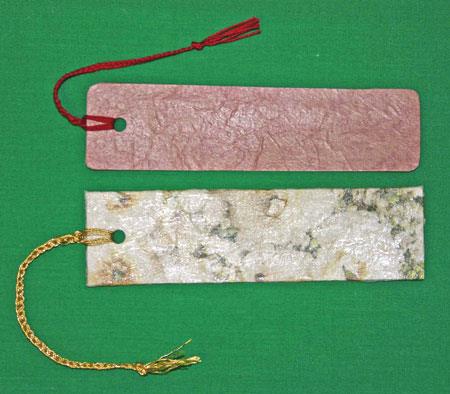
Due to the lightweight of the tissue paper, these bookmarks have an interesting crinkled texture.
First, cut the cardboard stabilizer to the size or pattern you want.
Above, the pink tissue paper bookmark used the rounded rectangle pattern.
The flowered napkin bookmark used a plain rectangle.
The stabilizer can be poster board, the cardboard found in folded shirts or other cardboard packaging.
Even though the tissue paper is thin, you do not want to use a heavy cardboard that could break the spine of the book. For example, matte board would be too heavy.
Or, you can cut a 5 x 8 index card to the shape you desire.
Next, let's take a look at construction paper bookmarks.
Easy Paper Crafts: Construction Paper Bookmarks Materials and Tools:
Paper - construction paper
Glue
Yarn
Scissors
Round object (to help with yarn braiding)
Straight edge or pattern
Hole punch
Glue
Yarn
Scissors
Round object (to help with yarn braiding)
Straight edge or pattern
Hole punch
The Steps for How to Make the Easy Paper Crafts: Construction Paper Bookmarks:
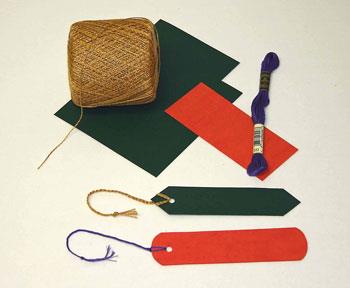
The construction paper is a heavier weight than regular paper but still needs more stability.
Two layers should be sufficient for most construction papers. But, some construction papers are thin and may need three layers.
Two layers should be sufficient for most construction papers. But, some construction papers are thin and may need three layers.
First, cut two or three bookmark pattern shapes out of the construction paper.
Apply glue to one side of the one of the shapes and glue to the other shape.
Place the bookmark between two flat relatively heavy objects (e.g., books) to help the glue adhere the layers.
If you use three layers, allow the glue to dry before gluing the third layer. Again, place between two flat objects.
Follow the braid instructions above to make the braid.
The purple braid shown is made with embroidery thread.
We're on a roll. Let's look at making bookmarks with gift wrapping paper.
Easy Paper Crafts: Gift Wrap Bookmarks Materials and Tools:
Paper - pretty gift wrap paper
Cardboard stabilizer - poster board or index card
Glue
Yarn
Scissors
Round object (to help with yarn braiding)
Straight edge or pattern
Hole punch
Cardboard stabilizer - poster board or index card
Glue
Yarn
Scissors
Round object (to help with yarn braiding)
Straight edge or pattern
Hole punch
The Steps for How to Make the Easy Paper Crafts: Gift Wrap Bookmarks:
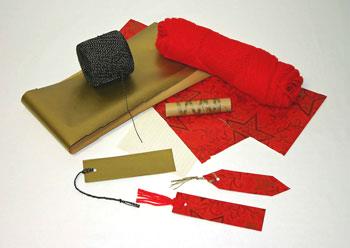
Gift wrap paper requires additional support.
Even two pieces glued together are not quite strong enough. However, only a lightweight stabilizer is needed.
Even two pieces glued together are not quite strong enough. However, only a lightweight stabilizer is needed.
First, cut the cardboard stabilizer to the size or pattern you want.
Above, two of these are simple rectangles with one from the bookmark patterns.
The stabilizer can be an index card or other lightweight cardboard.
If your gift wrap has some stability, you could add a third layer to provide the necessary strength.
Next, cut two pieces of the gift wrap paper slightly larger than the size of the stabilizer - one for each side.
Apply glue to one side of the stabilizer and glue one of the pieces of decorative paper to that side.
Place the bookmark between two flat relatively heavy objects (e.g., books) to help the glue adhere the layers.
One more...let's look at bookmarks made with greeting cards.
Easy Paper Crafts: Greeting Card Bookmarks Materials and Tools:
Paper - greeting card
Scissors
Yarn
Round object (to help with yarn braiding)
Straight edge or pattern
Hole punch
Scissors
Yarn
Round object (to help with yarn braiding)
Straight edge or pattern
Hole punch
The Steps for How to Make the Easy Paper Crafts: Greeting Card Bookmarks:
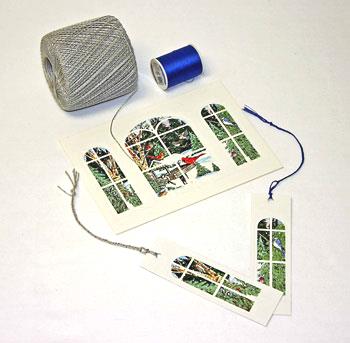
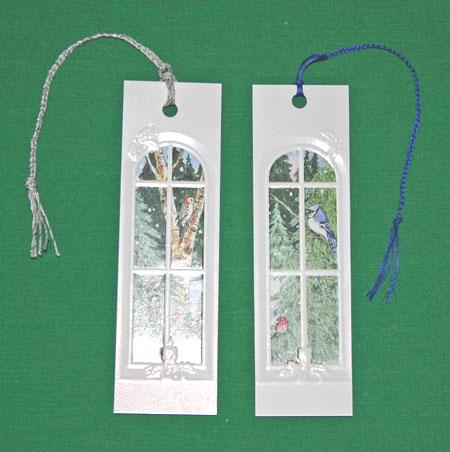
This greeting card was a Christmas card showing a winter scene of birds, trees and snow outside a bay window.
The two end windows are perfect for bookmarks.
The two end windows are perfect for bookmarks.
This card had a semi gloss coat and embossed decorations.
Select your greeting card either one of your unsent cards or maybe a pretty card you received.
Cut the desired shape - either rectangular or one of the patterns.
This card was stable enough to not need another layer.
If your greeting card needs additional strength, glue a decorative paper to the back.
Enjoy making, using and giving your simple and chic easy paper crafts bookmarks.


funEZcrafts
Welcome
Come on in and stay awhile...

funEZcrafts
Welcome
Come on in and stay awhile...
Wet and book the wallpaper the same as if you were putting it on the wall.
Next fold the bookmark into three equal sections and overlap the cut ends in the back.
Using paper towels, dry the moisture from the outside of the wallpaper but be careful not to remove the glue from the inside.
After partially drying, place the bookmark between two flat and relatively heavy objects to help the edges adhere to themselves.
Follow the braid instructions above to make the braid.
Since this bookmark is longer, you may want to have a longer braid.
After the bookmark fully dries, cut a round hole near the end and centered across the bookmark.
Insert the braid's loop into the hole, and pull the other end through until snugly attached.
Your easy paper crafts wallpaper border bookmark with braided tassel is finished.
When dry, using one of the patterns, trim the ends to the shape you prefer.
For these bookmarks instead of a braid, simple yarns tassels work instead.
Cut a round hole near the end and in the center of the width of your dried bookmark.
Take several pieces of yarn and fold in half to make a loop.
Insert the loop through the hole in the bookmark and pull the loose ends of the yarn through the loop until snug.
Decide on how long the yarn tassel should be and cut evenly.
In the bookmarks shown, three strands of black yarn ten inches long were used.
When folded, inserted and cut, the resulting tassel ends are 2.5 inches.
For your computer printed bookmarks, you can get two from one piece of 8.5 x 11 paper.
Your easy paper crafts computer printed bookmarks are finished.
Next, cut two pieces of the tissue paper or paper napkin slightly larger than the size of the stabilizer - one for each side.
(Hint: Some decorative paper napkins are two layers. The outside layer is lined with a white layer. Carefully separate the two layers and only use the decorative paper. Otherwise, the gluing process will be challenging.)
Apply glue to one side of the stabilizer and glue one of the pieces of decorative paper to that side.
Place the bookmark between two flat relatively heavy objects (e.g., books) to help the glue adhere the layers.
Allow the glue to dry before gluing the second side.
Again, place between two flat objects.
Follow the braid instructions above to make the braid.
The red braid shown on the pink tissue paper is made with yarn.
The gold braid is gold lame thread.
After both sides dry, trim the excess decorative paper from around the stabilizer shape.
Cut a round hole near the end and centered across the bookmark.
Insert the braid's loop into the cut hole, and pull the other end through the loop until snugly attached.
Your easy paper crafts tissue paper bookmark with braided tassel is finished.
Notice the interesting crinkled effect.
The gold braid is gold lame thread.
After the glue dries, cut a round hole near the end and centered across the bookmark.
Insert the braid's loop into the cut hole, and pull the other end through the loop until snugly attached.
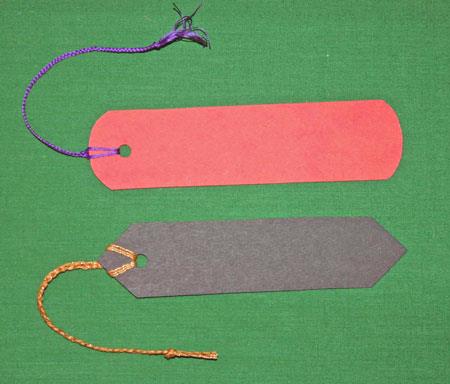
Your easy paper crafts construction paper bookmark with braided tassel is finished.
Suggestion: make these bookmarks out of school or business colors as interesting gifts with or without books.
After the glue dries, cut a round hole near the end and centered across the bookmark.
Insert the braid's loop into the cut hole, and pull the other end through the loop until snugly attached.
Your easy paper crafts construction paper bookmark with braided tassel is finished.
Suggestion: make these bookmarks out of school or business colors as interesting gifts with or without books.
Allow the glue to dry before gluing the second side. Again, place between two flat objects.
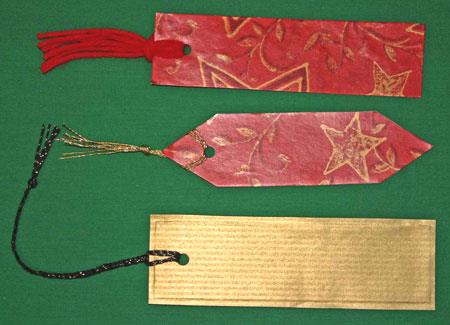
Follow the braid instructions above to make the braid. Or, if you prefer, make tassels instead.
The black and gold braid on the gold bookmark is made with black and gold metallic crochet yarn.
The gold tassel is gold lame thread.
The red tassel is knitting yarn.
After both sides of your bookmark dry, trim the excess gift wrap paper from around the stabilizer shape.
For the red bookmarks, the gift wrap paper was cut even with the stabilizer shape. The gold gift wrap extends 1/8 inch past the edge of the stabilizer on all sides.
Cut a round hole near the end and centered across the bookmark.
Insert the braid's loop into the cut hole, and pull the other end through the loop until snugly attached.
For tassels, take several pieces of yarn and fold in half to make a loop.
Insert the loop through the hole in the bookmark and pull the loose ends of the yarn through the loop until snug.
Decide on how long the yarn tassel should be and cut evenly.
Your easy paper crafts gift wrap paper bookmark is finished.
Follow the braid instructions above to make the braid.
For these two, the gray braid was made from gray and silver metallic crochet thread.
The blue braid was made using several strands of sewing thread.
Cut a round hole in the bookmark near the end and centered across the width.
Insert the loop through the hole in the bookmark then pull the tasseled end through the loop.
Pull the end until the loop snugly fits the end of the bookmark.
Your easy paper crafts greeting card bookmarks with braided tassel are finished!