Easy Christmas Crafts: Construction Paper Christmas Tree Wrapped in Lace
This pretty little Easy Christmas Crafts Construction Paper Christmas Tree can be made quickly, easily and inexpensively using construction paper, lace and sequins along with a few basic tools. The finished Christmas Tree sparkles on a desk or table. Just fun and playful.
This is a fun project for children to do. And, it's actually easier for them with their smaller fingers applying the sequins.
Let's look at a finished tree.
This is a fun project for children to do. And, it's actually easier for them with their smaller fingers applying the sequins.
Let's look at a finished tree.
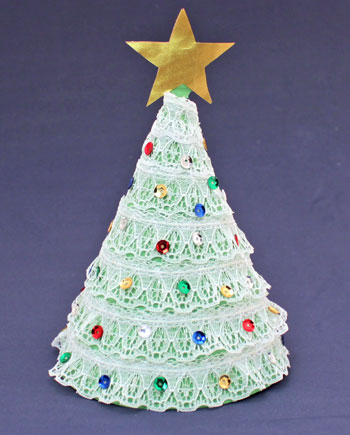
This Easy Christmas Crafts Construction Christmas Tree wrapped in lace is fun and easy to make. It can decorate a desk or table. Plus, the same simple steps work for larger trees as well.
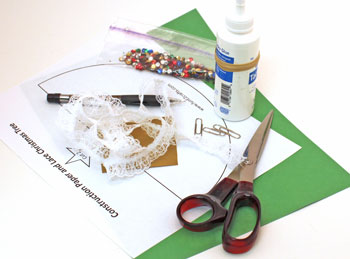
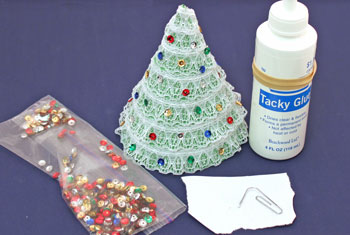
Easy Christmas Crafts: Construction Paper Christmas Tree Wrapped in Lace Materials and Tools:
Construction Paper one piece of green (or use scrapbooking card stock in green)
Lace - 1 1/4 yards of 3/4 inch wide lace
Multi-colored sequins
Gold paper - small piece for star (or use star stickers)
Glue
Paper clips
Pencil
Scissors
Pattern (Easy Christmas Crafts Construction Paper Christmas Tree pattern)
Paper towel - not shown, but necessary for glue mishaps and sticky fingers
Take a look at the simple materials and tools shown here. The paper is inexpensive construction paper, but other papers can be used as well.
The Steps for How to Make the Easy Christmas Crafts: Construction Paper Christmas Tree Wrapped in Lace:
Print the Easy Christmas Crafts Construction Paper Christmas Tree pattern. Cut around the pattern shapes.
Place the straight edge of the semi-circle along the straight edge of the construction paper.
Trace around the semi-circle on the paper.
Cut along the pencil line.
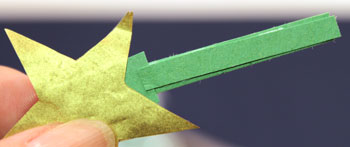
Trace the star pattern on the back of the gold paper twice.
Cut out the two stars.
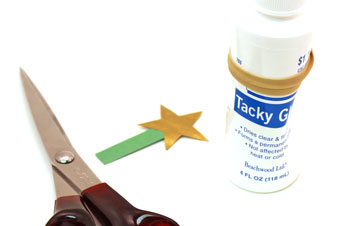
Cut a small piece of the construction paper 3/8 inch wide by 2 inches long.
Place the straight edge of the semi-circle along the straight edge of the construction paper.
Trace around the semi-circle on the paper.
Cut along the pencil line.
Trace the star pattern on the back of the gold paper twice.
Cut out the two stars.
Cut a small piece of the construction paper 3/8 inch wide by 2 inches long.

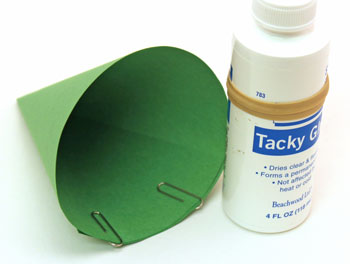
Wrap the semi-circle to form a cone shape.
Overlap the edges by roughly 3 inches.
Glue the edges together and hold in place with paper clips.
Overlap the edges by roughly 3 inches.
Glue the edges together and hold in place with paper clips.
Sandwich the small strip of construction paper between the two stars.
Glue the three pieces together.
Trim the edge of the glued star, if necessary, to even the edges.
Glue the three pieces together.
Trim the edge of the glued star, if necessary, to even the edges.
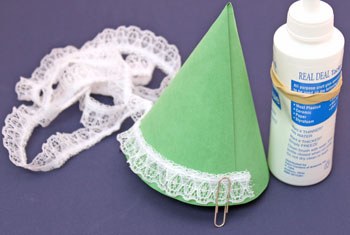
Begin gluing the lace to the bottom edge of the cone shape.
Start at the overlapped edge of the cone.
Start at the overlapped edge of the cone.
After wrapping the first row of lace, move the lace toward the top of the cone for the next row.
The bottom edge of the lace should touch or slightly overlap the previous row.
The bottom edge of the lace should touch or slightly overlap the previous row.
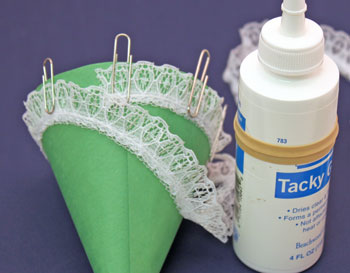
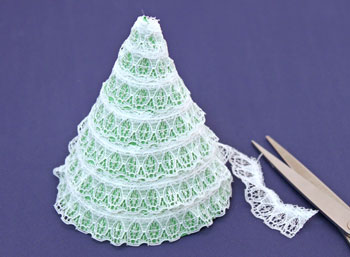
Continue wrapping and gluing the lace rows until the lace gets to the top of the cone.
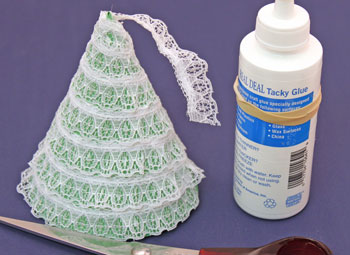
Trim the excess lace.
Secure the end of the lace to the top of the cone with glue.
Secure the end of the lace to the top of the cone with glue.
Glue the sequins to the lace in a random pattern.
I used a scrap of paper to hold a bead of glue and the end of a paper clip to apply the glue to the back of each sequin.
Yes, your fingers get sticky, but it really doesn't take very long to add the sequins.
I used a scrap of paper to hold a bead of glue and the end of a paper clip to apply the glue to the back of each sequin.
Yes, your fingers get sticky, but it really doesn't take very long to add the sequins.
Trim the edges of the star's base and add a couple of strips of paper to reinforce the stem.
(Hint: A flat toothpick glued between the two stars would be a good alternative to the construction paper.)
(Hint: A flat toothpick glued between the two stars would be a good alternative to the construction paper.)
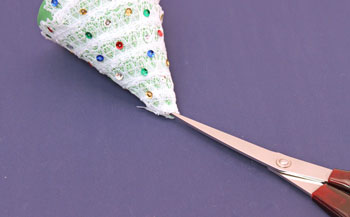
The hole at the top of the cone may not be large enough to insert the star.
Use the tip of the scissors to open the top of the cone.
Use the tip of the scissors to open the top of the cone.
Add the gold star to the top of the pretty little Easy Christmas Crafts Construction Paper Christmas Tree wrapped in lace.
The little tree can add sparkle to an office, a table or anywhere to bring holiday smiles.
The little tree can add sparkle to an office, a table or anywhere to bring holiday smiles.
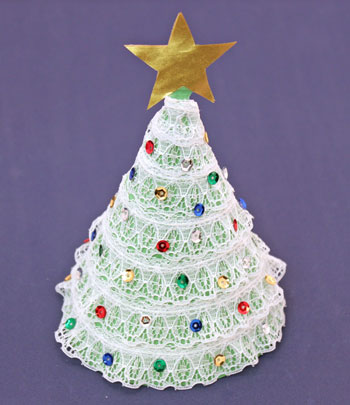
Simple materials and simple tools makes this a fun and easy project for people of all ages.
Larger trees can be easily made as well. Just make a larger semi-circle and add more lace. (You can find instructions and templates for making larger stars on the Five Point Star page.)
For a large tree, use craft paper from a 30 to 36-inch roll and make as large a semi-circle as possible (use a pencil and string to make the semi-circular shape).
Make the cone as shown above.
Use wider lace and apply as noted above. (The yardage depends on the lace and the size of the cone.)
Next, add large shiny, metallic stickers as the "ornaments." The stickers would be easier for seniors as the small sequins can pose problems for older fingers.
Fun, fast and easy!
Have fun making your own versions of this sparkly little tree!
The inexpensive and Easy Christmas Crafts Construction Paper Christmas Tree wrapped in lace can be fun for children, for families, for church groups and for senior centers.


funEZcrafts
Welcome
Come on in and stay awhile...

funEZcrafts
Welcome
Come on in and stay awhile...